Domain Addition
From CyberWurx Customer Wiki
| Revision as of 14:17, 20 October 2010 (edit) Cwadmin (Talk | contribs) ← Previous diff |
Revision as of 14:18, 20 October 2010 (edit) (undo) Cwadmin (Talk | contribs) (→Put all new domains on their own new IP addresses (ip based)) Next diff → |
||
| Line 25: | Line 25: | ||
| ==== Put all new domains on their own new IP addresses (ip based) ==== | ==== Put all new domains on their own new IP addresses (ip based) ==== | ||
| - | This option will create each domain in the list and assign it a random IP address from our pool of unused IP addresses. If you have 10 domains in the list, this will add 10 IP addresses to your account.<font color="#FF0000"> Any IP addresses that are over your plan's allotment of IP addresses will result in being charged for these additional IP addresses.</font> | + | This option will create each domain in the list and assign it a random IP address from our pool of unused IP addresses. If you have 10 domains in the list, this will add 10 IP addresses to your account.<font color="#FF0000"> If at any time your account exceeds its number of alloted IP addresses, you will be charged for these additional IP addresses.</font> |
| Advantages: | Advantages: | ||
Revision as of 14:18, 20 October 2010
Contents |
Instruction on Domain Additions
This will step you through adding a domain through the customer center.
Step 1 - Log into the customer center
This can be simply acheived by following the customer center login guide
Step 2 - Click on Domain Additions
Under the Service Additions tab, click Domain Additions.
Step 3 - Filling out the information
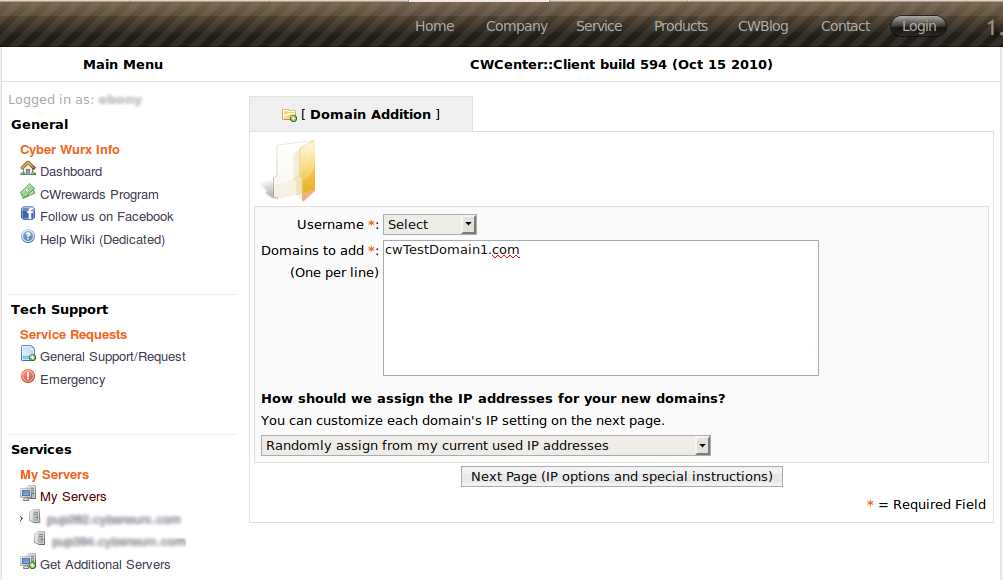
Next, simply fill out the information in the form pictured below:

- username: If you have multiple ftp users associated with your account, you can select which user you wish to associate with the domain. Otherwise, just select your default username from the list.
- Domains to Add: Just as the instructions say, enter as many domains as you wish, one per line.
Understanding IP Address Assignments
We have several commonly-used IP address assignment schemes already set up for you to choose from.
Share with any existing domains (namebased, this is default)
This option will select an IP address that is already in use on your account and set up all of the domains in the list onto that IP address.
Advantages:
- Unlimited domains, no extra charge.
Put all new domains on their own new IP addresses (ip based)
This option will create each domain in the list and assign it a random IP address from our pool of unused IP addresses. If you have 10 domains in the list, this will add 10 IP addresses to your account. If at any time your account exceeds its number of alloted IP addresses, you will be charged for these additional IP addresses.
Advantages:
- SSL certificates require a unique ip
- you are able to access and upload content to the domain before dns propagation via http://your.domains.ip.address
Randomly assign from my current used IP addresses
This option is similar to the [[namebased option, in that it will require no additional IPs on your account. However, unlike the namebased option, this will randomly assign each domain to one of the IP addresses used in your account. This typically results in a more even distribution of domains to IPs than the standard namebased option, since it doesn't pick simply 1 IP address, but instead spreads the domains across multiple IPs.
Advantages:
- Unlimited domains, no extra charge.
- More even distribution of Domains than standard namebased.
Put all new domains on a single new IP address
This option will add one new IP address to your account, regardless of how many domains are added, and set up all of the domains on this single new IP address. Just as with the IP based option any IP addresses that are over your plan's allotment of IP addresses will result in being charged for these additional IP addresses.
Other (Specify Below)
This should be used if you have a certain IP scheme you want to go by.
Please put this in Special Instructions.
Step 4 - Fill out the list
Please put the domains you want added 1 per line.
- To ensure a speedy response, please strip http:// and any www. from the domain.
An Ideal list:
domain.com
mydomain.us
cyberwurx.com
ilovehosting.com
Lists that need to be processed are:
http://domain.com
www.mydomain.us
cyberwurx.com/
http://www.ilovehosting.com
http://www.ilovecyberwurx.com/
Step 5 - Any special Instructions
If there are any extra notes you want to add regarding the domain add you will need to add them here.
Step 6 - Submit!
If all looks good, go ahead and click submit!
