Using the KVM over IP Device
From CyberWurx Customer Wiki
| Revision as of 17:04, 29 January 2008 (edit) Cwadmin (Talk | contribs) (→Step 3) ← Previous diff |
Current revision (12:44, 6 January 2010) (edit) (undo) Cwadmin (Talk | contribs) |
||
| (26 intermediate revisions not shown.) | |||
| Line 1: | Line 1: | ||
| = Obtaining an IPKVM = | = Obtaining an IPKVM = | ||
| - | If you would like an IPKVM installed on your system, write the support department. | + | If you would like an IPKVM connected to your system, write the support department. We offer hourly and monthly IP KVM leases and can get you set up within the hour most of the time. |
| - | = How to Use my IPKVM = | + | |
| - | If you obtained the IPKVM function on your server here are the instructions on logging in in a few simple steps. | + | |
| + | = How to use the IP KVM = | ||
| + | If you obtained the IP KVM function on your server here are the instructions on logging in in a few simple steps. | ||
| Before you begin, make sure you have logged into the [http://customer.cyberwurx.com customer center]. | Before you begin, make sure you have logged into the [http://customer.cyberwurx.com customer center]. | ||
| + | |||
| == Step 1 == | == Step 1 == | ||
| Line 22: | Line 25: | ||
| <br> | <br> | ||
| <br> | <br> | ||
| + | |||
| == Step 2 == | == Step 2 == | ||
| - | Now you are inside your IP KVM management page. Usually you will only see one device listed here. If you have more than one you will see each one here. | + | Now you are at your IP KVM list, which lists all IP KVM units that we've assigned to your account. |
| - | [[Image:Kvm_LaunchPage.Png|frame|right|Figure 2.2 - KVM managment.]] | + | [[Image:custkvm.jpg|frame|right|Figure 2.2 - KVM managment.]] |
| - | You would simply click Launch management for access to the KVM. | + | Click "Activate" to enable your KVM and start the clock. Hourly usage is tracked for billing and will be displayed on the page. |
| <br> | <br> | ||
| <br> | <br> | ||
| Line 38: | Line 42: | ||
| == Step 3 == | == Step 3 == | ||
| - | Log in with your customer center credentials and proceed to the kvm home screen. | + | [[Image:custkvm2.jpg|frame|left|Figure 2.3 - IP KVM activated.]] |
| - | [[Image:Kvm_login.Png|frame|left|Figure 2.3 - KVM login]] [[Image:Kvm_home_screen.PNG|frame|right|Figure 2.3.1 - KVM Home Screen]] | + | You're now ready to use your IP KVM! |
| <br> | <br> | ||
| <br> | <br> | ||
| <br> | <br> | ||
| <br> | <br> | ||
| + | <br> | ||
| + | <br> | ||
| + | <br> | ||
| + | <br> | ||
| + | <br> | ||
| + | <br> | ||
| + | <br> | ||
| + | <br> | ||
| + | <br> | ||
| + | <br> | ||
| + | <br> | ||
| + | <br> | ||
| + | <br> | ||
| + | <br> | ||
| + | <br> | ||
| + | <br> | ||
| + | |||
| + | == Step 4 == | ||
| + | Click on 'Launch management' to be taken to the IP KVM home screen. | ||
| + | [[Image:Kvm_home_screen.PNG|frame|right|Figure 2.4 - KVM Home Screen]] | ||
| <br> | <br> | ||
| <br> | <br> | ||
| Line 54: | Line 78: | ||
| <br> | <br> | ||
| From the Home screen, you can see your current desktop. | From the Home screen, you can see your current desktop. | ||
| + | <br> | ||
| + | <br> | ||
| + | <br> | ||
| + | <br> | ||
| + | <br> | ||
| + | <br> | ||
| + | <br> | ||
| + | <br> | ||
| + | <br> | ||
| + | <br> | ||
| + | <br> | ||
| + | <br> | ||
| + | <br> | ||
| + | <br> | ||
| + | <br> | ||
| + | <br> | ||
| + | <br> | ||
| + | |||
| + | |||
| + | = Common Problems = | ||
| + | We've experienced some problems in different kinds of setups, it depends on how your operating is set up. Here are some things to look out for: | ||
| + | |||
| + | |||
| + | * Keyboard doesn't work | ||
| + | |||
| + | Many motherboards will turn off the PS/2 keyboard port if a keyboard is not detected upon boot. Rebooting your system is the best first step to troubleshooting this. If it still does not work after that, there could be a setting that needs to be changed in the IP KVM's keyboard options. Feel free to write support and we can work with you on it. | ||
| + | |||
| + | |||
| + | * Keyboard stops working after reboot | ||
| + | |||
| + | This is usually a problem with the KVM autodetecting if it should use a USB or PS/2 keyboard. Usually PS/2 keyboard works best. You can go into the keyboard settings and change it to PS/2 only if it is not already set that way, it will usually solve this problem. | ||
| + | |||
| + | |||
| + | * Freeze up during boot | ||
| + | |||
| + | The USB connection has been the cause of a system not booting, we've only seen it happen once though. We can unplug the USB if you do not need the virtual floppy feature. | ||
| + | |||
| + | |||
| + | |||
| + | = Super PXE OS Loader = | ||
| + | For standard unmanaged systems (colo is not supported at this time), you may use our Super PXE Loader service free of charge. | ||
| + | |||
| + | |||
| + | PXE means Pre eXecution Environment, it is a way to boot the server off of the network. We use this feature to load operating systems without requiring a CD. The Super PXE Loader supports all major operating systems except for Windows at this time. | ||
| + | |||
| + | |||
| + | When your system boots up, you should be presented with a graphical menu displaying which boot option you'd like. If you do not get a boot menu, please feel free to ask support if the service is available for your system. | ||
| + | |||
| + | [[Image:Pxecust2.jpg|frame|center|Figure 3.1 - Super PXE Loader]] | ||
| + | |||
| + | If you have no interest in using this feature, it will time out in a few seconds. You can also just hit enter on Local Hard Drive to boot the local operating system. | ||
| + | |||
| + | |||
| + | == Testing or rescuing your system == | ||
| + | A variety of options are available for testing or rescuing your system. | ||
| + | |||
| + | === memtest86 === | ||
| + | Select memtest86 from the menu and hit enter, memtest86 will start up and test your memory until you tell it to stop. | ||
| + | |||
| + | === Debian Ramdisk Rescue === | ||
| + | This is a standard Debian Etch (4.0r0) rescue which will boot up your system in RAM, it will not use the hard drive at all. After the system has booted, you can mount your hard drives and work on your system. | ||
| + | |||
| + | === Gentoo === | ||
| + | If Gentoo is more your style, all recent versions of the Gentoo Live CD are available to boot your system up into a console. Gentoo is very good with hardware support, and should support most newer configurations. We've modified these images to support booting over the network. | ||
| + | |||
| + | === Other === | ||
| + | Several of the boot CDs (all of CentOS, Fedora and other Redhat variants) contain built in rescues. If you wanted to boot CentOS 5.1 i386 in rescue mode: | ||
| + | |||
| + | * Move the selection bar to CentOS 5.1 i386 | ||
| + | |||
| + | * Hit tab to edit boot options | ||
| + | |||
| + | * Append the word 'rescue' at the end of the line | ||
| + | |||
| + | * Hit enter to boot the rescue mode | ||
| + | |||
| + | * When the rescue mode prompts for the install media (to load the rescue shell), use our NFS server: | ||
| + | |||
| + | Hostname/IP address: 66.154.4.119 | ||
| + | Directory: /export/os/_OPERATING_SYSTEM_/_VERSION_/ (for example: /export/os/centos/5.1) | ||
| + | |||
| + | NFS directories always follow that format, and its always lower case. If you have trouble working out the proper directory, support can help you out. | ||
| + | |||
| + | |||
| + | == Installing an operating system == | ||
| + | If you'd like to install a new operating system on your server and it is available via the Super PXE Loader, simply move the cursor to the operating system you would like. | ||
| + | |||
| + | Before you hit enter, make a note of any comments we may have at the lower part of the screen. This will tell you any notes you need for installation, such as the NFS location of the installation data: | ||
| + | |||
| + | [[Image:Pxecust5.jpg|frame|center|Figure 3.1 - OS notes]] | ||
| + | |||
| + | It will boot the standard OS install media as if you had put the CD into the drive. | ||
| + | |||
| + | |||
| + | The only thing you would do different from a standard install is: when it prompts for install media, select 'NFS image'. | ||
| + | |||
| + | |||
| + | [[Image:Pxecust3.jpg|frame|center|Figure 3.2 - Select NFS for installation media source]] | ||
| + | |||
| + | |||
| + | Then put in our NFS information: | ||
| + | |||
| + | [[Image:Pxecust4.jpg|frame|center|Figure 3.3 - NFS server information]] | ||
| + | |||
| + | The directory will always follow the same format. | ||
| + | |||
| + | Thats all there is to it, continue the OS install as you would normally. | ||
| + | [[Category: Colocation]] | ||
| + | [[Category: Unmanaged Dedicated]] | ||
Current revision
Contents |
Obtaining an IPKVM
If you would like an IPKVM connected to your system, write the support department. We offer hourly and monthly IP KVM leases and can get you set up within the hour most of the time.
How to use the IP KVM
If you obtained the IP KVM function on your server here are the instructions on logging in in a few simple steps.
Before you begin, make sure you have logged into the customer center.
Step 1
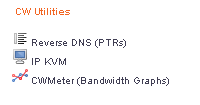
Verify you have the IPKVM enabled for your account. You should see an option under Services if it is in fact enabled.
The KVM will show up under services like Figure 2.1 shows.
Simply click on the IP KVM icon and proceed to step 2.
Step 2
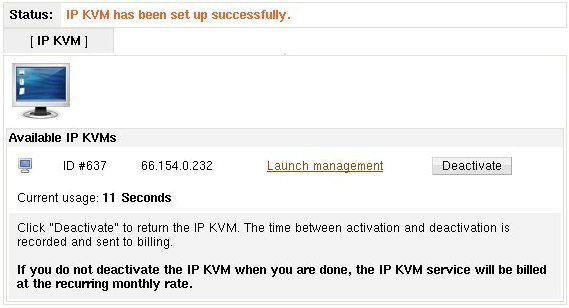
Now you are at your IP KVM list, which lists all IP KVM units that we've assigned to your account.
Click "Activate" to enable your KVM and start the clock. Hourly usage is tracked for billing and will be displayed on the page.
Step 3
You're now ready to use your IP KVM!
Step 4
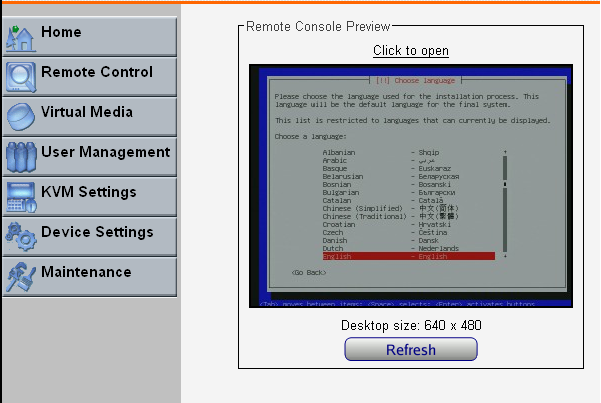
Click on 'Launch management' to be taken to the IP KVM home screen.
From the Home screen, you can see your current desktop.
Common Problems
We've experienced some problems in different kinds of setups, it depends on how your operating is set up. Here are some things to look out for:
- Keyboard doesn't work
Many motherboards will turn off the PS/2 keyboard port if a keyboard is not detected upon boot. Rebooting your system is the best first step to troubleshooting this. If it still does not work after that, there could be a setting that needs to be changed in the IP KVM's keyboard options. Feel free to write support and we can work with you on it.
- Keyboard stops working after reboot
This is usually a problem with the KVM autodetecting if it should use a USB or PS/2 keyboard. Usually PS/2 keyboard works best. You can go into the keyboard settings and change it to PS/2 only if it is not already set that way, it will usually solve this problem.
- Freeze up during boot
The USB connection has been the cause of a system not booting, we've only seen it happen once though. We can unplug the USB if you do not need the virtual floppy feature.
Super PXE OS Loader
For standard unmanaged systems (colo is not supported at this time), you may use our Super PXE Loader service free of charge.
PXE means Pre eXecution Environment, it is a way to boot the server off of the network. We use this feature to load operating systems without requiring a CD. The Super PXE Loader supports all major operating systems except for Windows at this time.
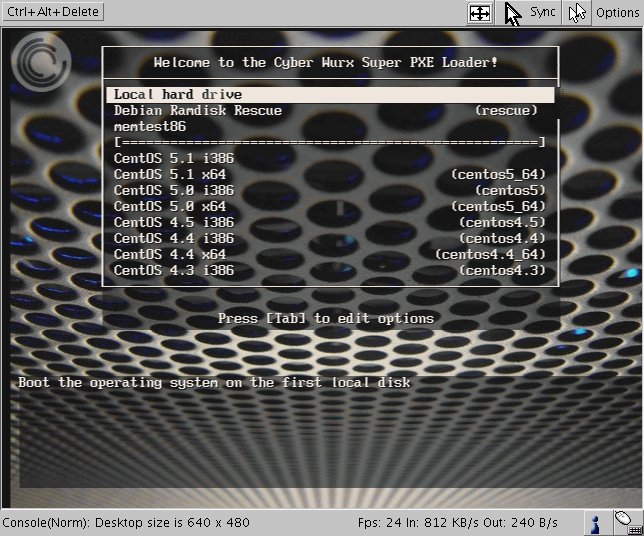
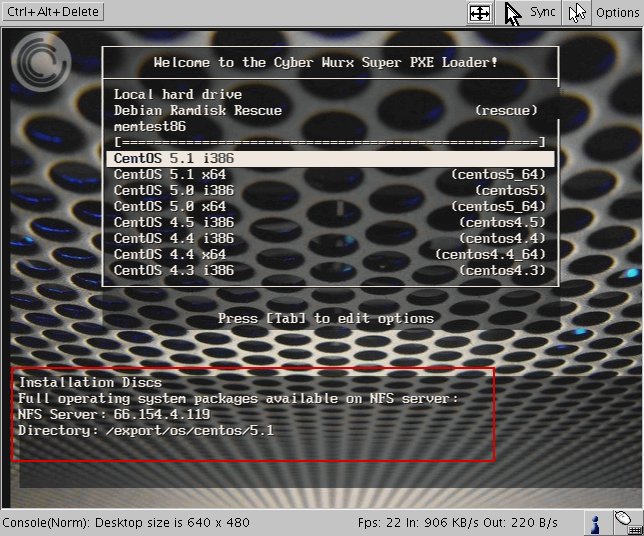
When your system boots up, you should be presented with a graphical menu displaying which boot option you'd like. If you do not get a boot menu, please feel free to ask support if the service is available for your system.
If you have no interest in using this feature, it will time out in a few seconds. You can also just hit enter on Local Hard Drive to boot the local operating system.
Testing or rescuing your system
A variety of options are available for testing or rescuing your system.
memtest86
Select memtest86 from the menu and hit enter, memtest86 will start up and test your memory until you tell it to stop.
Debian Ramdisk Rescue
This is a standard Debian Etch (4.0r0) rescue which will boot up your system in RAM, it will not use the hard drive at all. After the system has booted, you can mount your hard drives and work on your system.
Gentoo
If Gentoo is more your style, all recent versions of the Gentoo Live CD are available to boot your system up into a console. Gentoo is very good with hardware support, and should support most newer configurations. We've modified these images to support booting over the network.
Other
Several of the boot CDs (all of CentOS, Fedora and other Redhat variants) contain built in rescues. If you wanted to boot CentOS 5.1 i386 in rescue mode:
- Move the selection bar to CentOS 5.1 i386
- Hit tab to edit boot options
- Append the word 'rescue' at the end of the line
- Hit enter to boot the rescue mode
- When the rescue mode prompts for the install media (to load the rescue shell), use our NFS server:
Hostname/IP address: 66.154.4.119 Directory: /export/os/_OPERATING_SYSTEM_/_VERSION_/ (for example: /export/os/centos/5.1)
NFS directories always follow that format, and its always lower case. If you have trouble working out the proper directory, support can help you out.
Installing an operating system
If you'd like to install a new operating system on your server and it is available via the Super PXE Loader, simply move the cursor to the operating system you would like.
Before you hit enter, make a note of any comments we may have at the lower part of the screen. This will tell you any notes you need for installation, such as the NFS location of the installation data:
It will boot the standard OS install media as if you had put the CD into the drive.
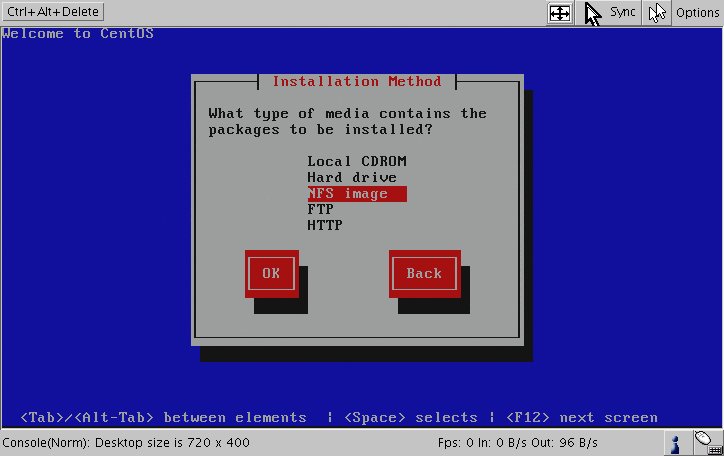
The only thing you would do different from a standard install is: when it prompts for install media, select 'NFS image'.
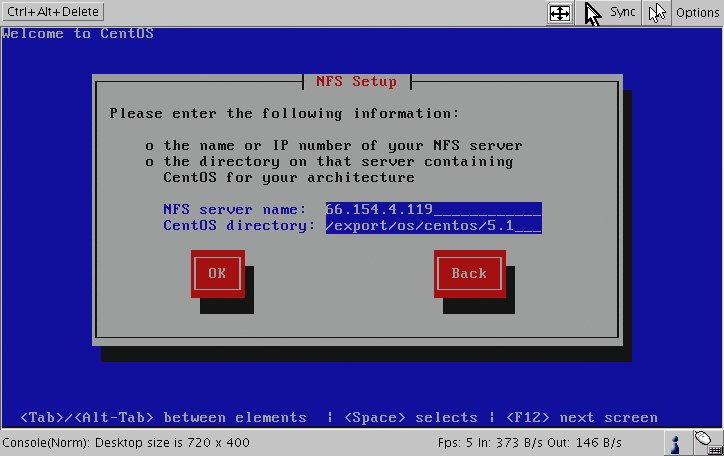
Then put in our NFS information:
The directory will always follow the same format.
Thats all there is to it, continue the OS install as you would normally.
